Jan 08

关于浏览器支持 TLSv1.3 的情况请参考:https://caniuse.com/#feat=tls1-3

主流的 Chrome 70+ 版本支持 TLS 1.3 Final;Firefox 63+ 确认 about:config 中的 security.tls.version.max 为 4;

具体方法:

1. 修改 lnmp1.5 脚本文件
首先是 \lnmp1.5\include\version.sh 文件,将 Openssl_Ver='openssl-1.0.2o' 修改为:Openssl_Ver='openssl-1.1.1a'

2. 使用 lnmp1.5 脚本升级 nginx

进入 lnmp1.5 目录,执行命令:

./upgrade.sh nginx

然后输入需要升级的 nginx 版本号,如目前最新的 1.15.8。nginx 最新版本号可从官网获取:http://nginx.org

静待编译完成。

执行 nginx -V 可查询详细配置信息:

nginx version: nginx/1.15.8
built by gcc 5.4.0 20160609 (Ubuntu/Linaro 5.4.0-6ubuntu1~16.04.11)
built with OpenSSL 1.1.1a 20 Nov 2018
TLS SNI support enabled
configure arguments: --user=www --group=www --prefix=/usr/local/nginx --with-http_stub_status_module --with-http_ssl_module --with-http_v2_module --with-http_gzip_static_module --with-http_sub_module --with-stream --with-stream_ssl_module --with-openssl=/home/vmmate/Src/lnmp1.5-full/src/openssl-1.1.1a --with-ld-opt='-ljemalloc'

3. 修改主机配置文件

ssl_protocols 加入 TLSv1.3 支持,如:

ssl_protocols TLSv1 TLSv1.1 TLSv1.2 TLSv1.3;

ssl_ciphers 参考配置(包含 TLS13 是 TLS 1.3 新增的 Cipher Suite,加在最前面即可;):

ssl_ciphers TLS13-AES-256-GCM-SHA384:TLS13-CHACHA20-POLY1305-SHA256:TLS13-AES-128-GCM-SHA256:TLS13-AES-128-CCM-8-SHA256:TLS13-AES-128-CCM-SHA256
:EECDH+CHACHA20:EECDH+CHACHA20-draft:EECDH+ECDSA+AES128:EECDH+aRSA+AES128
:RSA+AES128:EECDH+ECDSA+AES256:EECDH+aRSA+AES256:RSA+AES256:EECDH+ECDSA+3DES
:EECDH+aRSA+3DES:RSA+3DES:!MD;

文件修改完,重启一下 nginx:

sudo lnmp nginx restart

然后就可以去浏览器访问验证一下。

TLSv1.3 是否开启成功验证:

1、Chrome 70+ 版本打开网站,F12 打开开发者工具,「Security」可以看到 Connection - secure (strong TLS 1.3) 字样信息。
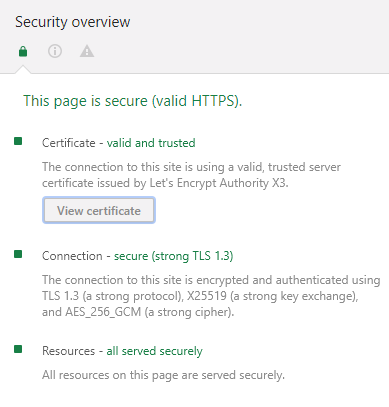
2、Firefox 63+ 版本打开网站,F12 打开开发者工具,「网络」,刷新页面,在「网络」资源列表下随便选中一个本站链接或者打开页面的链接,然后在右侧详细信息查看「安全性」即可看到连接协议版本。

3、在线检测:https://www.ssllabs.com。


Jan 06

Tomato 下面运行需要 SSL/TLS 连接的 Golang 程序(多为静态编译),可能会出现类似:

x509: certificate signed by unknown authority

这样的证书相关问题,目前遇到过的有 overture 以及 dnscrypt-proxy这里有讨论。

主要就是 x509 默认只在以下目录搜索证书:

"/etc/ssl/certs", // SLES10/SLES11, https://golang.org/issue/12139
"/system/etc/security/cacerts", // Android
"/usr/local/share/certs", // FreeBSD
"/etc/pki/tls/certs", // Fedora/RHEL
"/etc/openssl/certs", // NetBSD

或者这几个文件:(https://mirrors.segmentfault.com/golang/root_linux.go)


// Possible certificate files; stop after finding one.
var certFiles = []string{
"/etc/ssl/certs/ca-certificates.crt", // Debian/Ubuntu/Gentoo etc.
"/etc/pki/tls/certs/ca-bundle.crt", // Fedora/RHEL 6
"/etc/ssl/ca-bundle.pem", // OpenSUSE
"/etc/pki/tls/cacert.pem", // OpenELEC
"/etc/pki/ca-trust/extracted/pem/tls-ca-bundle.pem", // CentOS/RHEL 7
}

而 Entware 默认是安装在 /opt/etc/ssl 目录下;

查看 Golang 源码提示可以设置环境变量:

https://golang.org/src/crypto/x509/root_unix.go

const (
// certFileEnv is the environment variable which identifies where to locate
// the SSL certificate file. If set this overrides the system default.
certFileEnv = "SSL_CERT_FILE"
// certDirEnv is the environment variable which identifies which directory
// to check for SSL certificate files. If set this overrides the system default.
certDirEnv = "SSL_CERT_DIR"
)

解决办法:

1. 通过 Entware 安装 ca 证书:

opkg update
opkg upgrade
opkg install ca-bundle
opkg install ca-certificates

2. 在 /opt/etc/.profile 中设置环境变量:

# SSL for Golang
export SSL_CERT_FILE=/opt/etc/ssl/certs/ca-certificates.crt
export SSL_CERT_DIR=/opt/etc/ssl/certs

这样就没问题了。


Dec 28

Stubby 是一款支持 DNS-over-TLS 的 DNS 服务器,详情可参考:

https://dnsprivacy.org/wiki/display/DP/DNS+Privacy+Daemon+-+Stubby

要支持 TLS 1.3,必须先编译 OpenSSL 1.1.1

cd /mnt/data/compile/openssl-1.1.1/
./config
make
mkdir lib
cp libssl.a libcrypto.a lib/
cp include/openssl/* include/

注意,为了不影响原系统,并不安装此 OpenSSL 版本!

还需要编译 libyaml 支持库:

cd /mnt/data/compile/yaml-0.2.1/
./configure --enable-static --disable-shared --prefix=/mmc
make install

然后通过 getdns 静态编译出 Stubby:

cd /mnt/data/compile/getdns-1.5.0/
LDFLAGS="-Wl,-static -static -static-libgcc -s" ./configure --disable-shared --without-libunbound --without-libidn --without-libidn2 --with-ssl=/mnt/data/compile/openssl-1.1.1 --with-stubby --with-piddir=/var/run --prefix=/opt
make

就可以在 src 下得到需要的文件:

file src/stubby
src/stubby: ELF 32-bit LSB executable, ARM, EABI5 version 1 (GNU/Linux), statically linked, stripped, with debug_info


Dec 03

项目地址:
https://github.com/aarond10/https_dns_proxy

特色功能:
自从 Google 发布 DNS-Over-HTTPS 服务以来,其实有很多基于此服务写的程序,但是目前看起来这个项目实现的比较好:
C++ 实现,执行文件很小 (30kiB,静态编译的版本约为 900k),比大多数用 Go 写的小得多
基于 Curl HTTP/2 API , 解析延迟极小
单线程无阻塞式查询,适用于嵌入式系统如路由器等
最好作为 DNSMASQ 这样带缓存的 DNS 服务器上游.
由于 Google 这个服务支持 EDNS SUBNET 的查询,所以理论上通过这个服务器查询的结果不会有 CDN 的问题,当然实际还需时间来证明。

Usage: https_dns_proxy [-a ] [-p ]
[-e ] [-d] [-u ] [-g ] [-b ]
[-l ]
-a listen_addr 监听地址. (127.0.0.1)
-p listen_port 监听端口. (5053)
-e subnet_addr edns-client-subnet edns 子网 “203.31.0.0/16”. 建议通过路由器外网地址来计算()
-d 后台运行.
-u user 用户名. (nobody)
-g group 用户组. (nobody)
-b dns_servers 用来解析 dns.google.com 的域名服务器. (8.8.8.8,8.8.4.4)
-t proxy_server 代理服务器,例如: socks5://127.0.0.1:1080,http://127.0.0.1:8080 (注意上面 dns.google.com 的解析不通过此代理!)
-l logfile 日志文件. (-)
-v 开启调试信息. (INFO)

上面的 subnet_addr 可以通过一些命令行获取,例如:

$(nvram get wan_ipaddr | cut -d "." -f 1-2).0.0/16

如果是内网,则应该用:

curl -sS ifconfig.co | cut -d "." -f 1-2
或者
wget http://ipecho.net/plain -O - -q | cut -d "." -f 1-2

这个在 Tomatoware 上静态编译稍微有点麻烦:

1. 首先要编译 curl (及其库)支持 http2,这样用到 nghttp2:

git clone https://github.com/tatsuhiro-t/nghttp2.git
cd nghttp2
autoreconf -i
automake
autoconf
./configure --prefix=/mmc
make
make install

2. 编译 curl :

#!/bin/sh

[ ! -e ./curl.pem ] && wget -qO curl.pem https://curl.haxx.se/ca/cacert.pem

[ -n "$1" ] && ssVersion=$1 || ssVersion="git"

mkdir -p done/${ssVersion}/OpenSSL-opt

echo "Compiling OpenSSL Version..."
make clean
[ ! -e  /opt/sbin/curl.pem ] && cp ./curl.pem /opt/sbin/
./configure --prefix=/mmc --with-ca-bundle=/opt/sbin/curl.pem --with-nghttp2 
--disable-ldap
make -j2 LDFLAGS="-all-static -s" LIBS="-ldl"
[ $? -eq 0 ] || { echo "Compiling OpenSSL failed."; exit 1; }
make install
mv -f src/curl done/${ssVersion}/OpenSSL-opt/

echo -e "Compile Result:n"

file done/${ssVersion}/OpenSSL-opt/curl

echo ""

done/${ssVersion}/OpenSSL-opt/curl -V

3. 静态编译 https_dns_proxy,修改过的 CMakeList.txt:

project(HttpsDnsProxy)
cmake_minimum_required(VERSION 2.8)

#set(CMAKE_BUILD_TYPE "Debug")
set(CMAKE_BUILD_TYPE "Release")

# set(CMAKE_C_FLAGS "-Wall --pedantic -Wno-strict-aliasing")

set(NXJSON_DIR lib/nxjson/)
set(NXJSON_SRC ${NXJSON_DIR}/nxjson.c)

find_path(LIBCARES_INCLUDE_DIR ares.h)
find_path(LIBCURL_INCLUDE_DIR curl/curl.h)
find_path(LIBEV_INCLUDE_DIR ev.h)
include_directories(
${LIBCARES_INCLUDE_DIR} ${LIBCURL_INCLUDE_DIR}
${LIBEV_INCLUDE_DIR} ${NXJSON_DIR} src)

# The main binary
set(TARGET_NAME "https_dns_proxy")
aux_source_directory(src SRC_LIST)
set(SRC_LIST ${SRC_LIST} ${NXJSON_SRC})
add_executable(${TARGET_NAME} ${SRC_LIST})
#set(LIBS ${LIBS} cares curl ev resolv ssl crypto dl z m)
set(LIBS ${LIBS} cares curl ev resolv ssh2 ssl psl crypto dl z m nghttp2)
target_link_libraries(${TARGET_NAME} ${LIBS})

# Link to static libraries if needed
IF(STATIC_LIB)
SET(CMAKE_FIND_LIBRARY_SUFFIXES ".a")
SET(CMAKE_EXE_LINKER_FLAGS "${CMAKE_EXE_LINKER_FLAGS} -s -static")
ENDIF(STATIC_LIB)

install(CODE "MESSAGE(\"Please install manually for now.\")")

然后:

mkdir b
cd b
cmake -DSTATIC_LIB=ON ..
make

file ./https_dns_proxy
./https_dns_proxy: ELF 32-bit LSB executable, ARM, EABI5 version 1 (SYSV), statically linked, stripped


Dec 16

1. 首先你需要购买一个域名;

2. 证书的获取:

Linux 下可以用 Certbot,acme.sh 等工具来从 Let’s Encrypt 获取证书;

Windows 下推荐用 Caddy 来获取证书,推荐把域名服务器临时设为 Cloudflare 的,然后通过 API 让 Caddy 自动获取证书,API 设置为环境变量,Caddyfile 简单设置为:

mydomain.com:443
root E:WWW
gzip
log ../access.log
tls {
dns cloudflare
}

然后直接运行一下 Caddy.exe 就行了,证书储存在 用户名/.caddy 目录下。

3. 创建服务端:

这里就要用到强大的 Gost 了,各类隧道创建方式:

gost -L="http://user:password@:25" -L="http2://user:password@:143?cert=cert.pem&key=key.pem" -L="socks+tls://user:password@:587?cert=cert.pem&key=key.pem" -L="http+tls://user:password@:465?cert=cert.pem&key=key.pem" -logtostderr -v 5

这么一行就依次创建了:一个监听在 25 端口的支持 http-connect 的代理,一个加密的 http2 代理,一个 Socks Over TLS 代理(目前 Surge 支持)和一个 https 代理,user:password 是用户名密码,cert 和 key 分别是上面域名的数字证书的公匙和私匙。

4. 客户端:

http,https 和 socks5 隧道,Chrome 浏览器(或者通过 SwitchyOmeda 扩展)都直接支持,Socks5 over TLS 目前只看到 Surge 直接支持,http2 没看到直接支持的。不过我们可以转换成普通的 http/socks5 代理来用(远程通讯依然是 TLS 或者 HTTP2 加密的),例如:

#转换 https 为 http,监听在本地 7575 端口
gost -L=http://0.0.0.0:7575 -F=http+tls://user:password@mydomain.com:465?cert=cert.pem&key=key.pem
#转换 socks5 over TLS 为 socks5
gost -L=socks://0.0.0.0:7676 -F=socks+tls://user:password@mydomain.com:587?cert=cert.pem&key=key.pem
#转换 http2 为 socks5
gost -L=socks://0.0.0.0:7878 -F=http2://user:password@mydomain.com:143?cert=cert.pem&key=key.pem

也可以用 HAProxy 做 socks+tls 和 https 的客户端,改天写下。

这样转换后的代理,是可以通过 redsocks2 来透明代理的。


[12/59]  «< 7 8 9 10 11 12 13 14 15 16 > ... »