发布于Software分类中的文章

Jan 02

2024 更新:

最快的方法还是在虚拟机中交叉编译, 而且最新的 1.2x 版本如果在路由器编译会很容易内存溢出。

下载源码,解压后在 Alpine/Debian 虚拟机中执行:

cd /root/src/go/src
GOARCH=arm GOARM=5 GOOS=linux ./make.bash -v

完成后用 go/bin/linux_arm/ 下的文件替换 go/bin/ 下面的 go 和 gofmt 两个同名文件;删除 go/pkg/tool/linux_amd64 目录,然后打包:

cd ../bin
mv linux_arm/* ./
rm -rf linux_arm/
cd ../pkg
rm -rf tool/linux_amd64/
tar --numeric-owner -czf /root/src/go1.22.5.linux-armv7.tar.gz -C /root/src go

复制到路由器上:

rm -fr /mnt/data/go
tar -xzf /mnt/data/go1.22.5.linux-armv7.tar.gz -C /mnt/data
export PATH=/mnt/data/go/bin:$PATH
go version

------------------------------------------------------------------------------------------------------------------------------

可以不看

编译后的版本在 Tomato 这种老内核上运行没问题,支持(基于博通 BCM 4708/4709 的 Asus RT-AC68U/P/Netgear R7000/6300v2/6250/小米) 等路由器。

参考: How to compile Go on any ARM device


Dec 30

先配置下选项,我这里以 PolarSSL 为例:
./configure --prefix=/opt --with-crypto-library=polarssl --with-polarssl=/mmc/lib --with-polarssl-include=/mmc/include

为了解决编译时出现的 epoll 相关错误(应为 uClibc 版本低的原因),需要:
sed -i "s/epoll_create1/epoll_create/g" ./libev/ev_epoll.c

使用 ldtools 的话,可以在编译二进制文件时指定 -all-static:
sed -i "s/LDFLAGS = /LDFLAGS = -all-static/g" ./src/Makefile

然后就可以:

make
strip ./src/ss-*
make install

Dec 14

在 DD-WRT 下非交互式状态执行脚本时,所执行的脚本最好加上下面的内容:

export PATH=/bin:/usr/bin:/sbin:/usr/sbin:/jffs/sbin: 
/jffs/bin:/jffs/usr/sbin:/jffs/usr/bin:/mmc/sbin:/mmc/bin: 
/mmc/usr/sbin:/mmc/usr/bin:/opt/sbin:/opt/bin:/opt/usr/sbin: 
/opt/usr/bin
export LD_LIBRARY_PATH=/lib:/usr/lib:/jffs/lib:/jffs/usr/lib: 
/jffs/usr/local/lib:/mmc/lib:/mmc/usr/lib:/opt/lib:/opt/usr/lib

特别是 LD_LIBRARY_PATH 这个环境变量,要不很多脚本在 shell 下可以执行,一旦放到计划任务等非交互状态下就不能执行了,还不好调试!


Nov 24

下载编译 libsodium:

git clone https://github.com/jedisct1/libsodium.git
cd libsodium
./autogen.sh
./configure --enable-minimal --enable-static --disable-shared --prefix=/mmc
make && make install

静态编译 dnscrypt-proxy:

git clone https://github.com/jedisct1/dnscrypt-proxy.git
cd dnscrypt-proxy
./autogen.sh
./configure LDFLAGS='-Wl,-static -static -static-libgcc -s -Wl,--gc-sections' --prefix=/opt
#1.7.0+
LDFLAGS='-Wl,-static -static -static-libgcc -s' ./configure --prefix=/opt --with-included-ltdl && make -j2
make

:twisted: :twisted: :twisted:


Nov 05

使用 Tomato 固件,先下载 tomatoware:

CMake:
./bootstrap --prefix=/mmc && make && make install

libsodium:
./configure --prefix=/mmc && make && make install

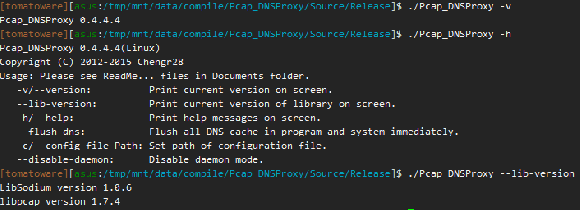
然后静态编译 DNSProxy" title="Pcap_DNSProxy GITHUB" rel="external">Pcap_DNSProxy ,需要修改下源码的 /Pcap_DNSProxy/Source/Pcap_DNSProxy/CMakeLists.txt 文件:

Executable file name
#static
SET(CMAKE_FIND_LIBRARY_SUFFIXES ".a")
SET(BUILD_SHARED_LIBRARIES OFF)
SET(CMAKE_EXE_LINKER_FLAGS "-static -pthread -Wl,--whole-archive 
-lpthread -Wl,--no-whole-archive")
#static
add_executable(Pcap_DNSProxy ${MAIN_SRC_FILES})
IF(PLATFORM_OPENWRT)
INSTALL(TARGETS Pcap_DNSProxy RUNTIME DESTINATION sbin)
ENDIF(PLATFORM_OPENWRT)

注意:单独使用 -static 编译出来的文件执行会出错,要结合后面那堆参数:

terminate called after throwing an instance of 'std::system_error'
what(): Enable multithreading to use std::thread: Operation not permitted

Pcap_DNSProxy

当然还是希望作者加一个静态编译的开关选项。

已提交,作者已添加:

* 使用 ./Linux_Build.sh 执行编译程序
* 添加参数 --enable-static 即 ./Linux_Build.sh --enable-static 可启用静态编译


Jul 17

Charter 是国外一个 ISP,它们提供给客户一个 OEM 版本的 R6300 V2,硬件构成和 Netgear R6300 V2 完全相同。外观上,Charter 版本为磨砂面,"NETGEAR" 字样的 Logo 不发光(实际上内部印刷版上有 LED,但是由于外壳不透光所以...),而 Negear 零售版本是镜面 + 发光 Logo。

进入管理界面,Charter 的固件版本显示为 V1.0.3.6_1.0.63CH,注意后面的 CH 字样,不能升级 Netgear 官方固件,也不能直接刷针对 R6300 V2 的 DD-WRT 或者 Tomato 固件,会提示类似信息:

This firmware file is incorrect! Please get the firmware file again and make sure it is the correct firmware for this product.

1. 刷 Kong 的 DD-WRT K3 固件预刷版本,下载地址:dd-wrt.K3_R6300V2CH.chk

2. 登陆 DD-WRT,开启 SSH 服务,用 SSH 客户端登陆路由器,键入以下命令:

burnboardid U12H240T00_NETGEAR

重启路由器,重启完成后,你的路由器已经变成标准版的 Netgear R6300V2

3. 如果只是想刷 DD-WRT,到这一步就可以刷标准 Netgear R6300V2 的 DD-WRT 固件了,包括 BS 版本;

4. 在 DD-WRT 界面刷入 Netgear 官方的 R6300V2 固件,去官方下载即可;

5. 刷入 Shibby Tomato 固件的预刷版本:tomato-R6300v2-initial.chk

6. 刷 Tomato ARM 其他版本。


May 10

其实就是注意 -ldl 放的位置,之前放在 LDFLAGS 最后老是提示 -lcrypto 错误(这样放,在路由器上编译好像没事~~ :evil: ):

make clean

LIBS="-ldl" LDFLAGS="-Wl,-static -static -static-libgcc" ./configure --host=arm-brcm-linux-uclibcgnueabi CC=arm-brcm-linux-uclibcgnueabi-gcc --with-openssl=/home/punk/arm_apps/libs/openssl

make -j`nproc`


Apr 17

直接编译会出错:

/opt/lib//libcrypto.a(c_zlib.o): In function zlib_stateful_expand_block': c_zlib.c:(.text+0x54): undefined reference toinflate'
/opt/lib//libcrypto.a(c_zlib.o): In function zlib_stateful_compress_block': c_zlib.c:(.text+0xd8): undefined reference todeflate'
/opt/lib//libcrypto.a(c_zlib.o): In function bio_zlib_free': c_zlib.c:(.text+0x128): undefined reference toinflateEnd'
c_zlib.c:(.text+0x144): undefined reference to deflateEnd' /opt/lib//libcrypto.a(c_zlib.o): In functionzlib_stateful_finish':
c_zlib.c:(.text+0x194): undefined reference to inflateEnd' c_zlib.c:(.text+0x19c): undefined reference todeflateEnd'
/opt/lib//libcrypto.a(c_zlib.o): In function zlib_stateful_init': c_zlib.c:(.text+0x224): undefined reference toinflateInit_'
c_zlib.c:(.text+0x26c): undefined reference to deflateInit_' /opt/lib//libcrypto.a(c_zlib.o): In functionbio_zlib_ctrl':
c_zlib.c:(.text+0x4a0): undefined reference to deflate' c_zlib.c:(.text+0x56c): undefined reference tozError'
/opt/lib//libcrypto.a(c_zlib.o): In function bio_zlib_write': c_zlib.c:(.text+0x708): undefined reference todeflate'
c_zlib.c:(.text+0x794): undefined reference to zError' c_zlib.c:(.text+0x824): undefined reference todeflateInit_'
/opt/lib//libcrypto.a(c_zlib.o): In function bio_zlib_read': c_zlib.c:(.text+0x900): undefined reference toinflate'
c_zlib.c:(.text+0x954): undefined reference to zError' c_zlib.c:(.text+0x9e0): undefined reference toinflateInit_'
collect2: error: ld returned 1 exit status
Makefile:94: recipe for target 'redsocks2' failed
make: *** [redsocks2] Error 1

解决方法,修改 Makefile:
override LIBS += -lssl -lcrypto -ldl

改成:
override LIBS += -lssl -lcrypto -ldl -lz

然后:
CCFLAGS=-static make

或者(tomatoware)
LDFLAGS="-Wl,-static -static -static-libgcc" make

编译成功。


Oct 21

下载源码: https://github.com/madeye/shadowsocks-libev

直接编译会出错:

/tmp/cciqCfzf.s: Assembler messages:
/tmp/cciqCfzf.s:2903: Error: opcode not supported on this processor: mips1 (mips1) `sync'

修改 \shadowsocks-libev-master\libev 下的 ev.c :

找到:

#define ECB_MEMORY_FENCE         __asm__ __volatile__ ("sync"     : : : "memory")

改为:

#define ECB_MEMORY_FENCE         __asm__ __volatile__ (".set mips2; sync; .set mips0" ::: "memory")

有两处,都改吧。(参考:http://permalink.gmane.org/gmane.comp.lib.ev/2182)

再编译就可以通过了:

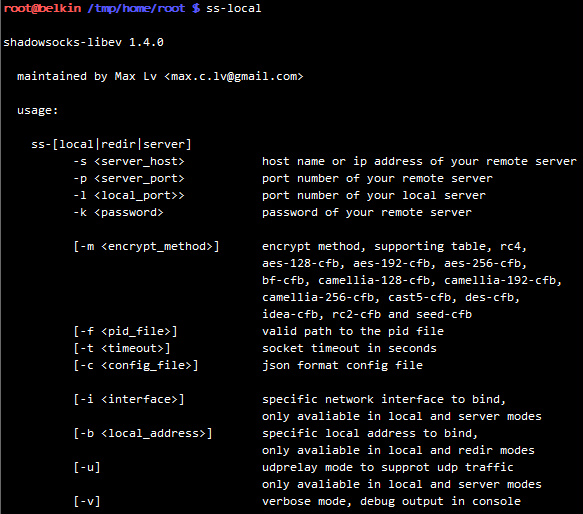
Shadowsocks.1.4.0.Tomato.gif


May 05

其实 DD-WRT,OpenWRT 也可以,只要开了 SSH 远程登录。

主要的工具是 Bitvise Tunnelier 里面带的 sexec.exe,命令行是:

sexec 用户名@路由器地址:SSH端口 -pw=SSH登录密码 -cmd="wl radio on"

SSH 端口默认是 22 ,如果没改就不需要填。

范例:

开启无线:

sexec root@192.168.2.1 -pw=Abcd111222 -cmd="wl radio on"
ping 127.0.0.1 -n 6 -w 1000
sexec root@192.168.2.1 -pw=Abcd111222 -cmd="wl -i eth2 radio on"

关闭无线:

sexec root@192.168.2.1 -pw=Abcd111222 -cmd="wl radio off"
ping 127.0.0.1 -n 6 -w 1000
sexec root@192.168.2.1 -pw=Abcd111222 -cmd="wl -i eth2 radio off"

wl -i eth2 radio on/off 是用来控制有 5G 路由器的频段开关的,一般 2.4G 的不需要这行。


[6/21]  < 1 2 3 4 5 6 7 8 9 10 > ... »