发布于Software分类中的文章

Jan 08

关于浏览器支持 TLSv1.3 的情况请参考:https://caniuse.com/#feat=tls1-3

主流的 Chrome 70+ 版本支持 TLS 1.3 Final;Firefox 63+ 确认 about:config 中的 security.tls.version.max 为 4;

具体方法:

1. 修改 lnmp1.5 脚本文件
首先是 \lnmp1.5\include\version.sh 文件,将 Openssl_Ver='openssl-1.0.2o' 修改为:Openssl_Ver='openssl-1.1.1a'

2. 使用 lnmp1.5 脚本升级 nginx

进入 lnmp1.5 目录,执行命令:

./upgrade.sh nginx

然后输入需要升级的 nginx 版本号,如目前最新的 1.15.8。nginx 最新版本号可从官网获取:http://nginx.org

静待编译完成。

执行 nginx -V 可查询详细配置信息:

nginx version: nginx/1.15.8
built by gcc 5.4.0 20160609 (Ubuntu/Linaro 5.4.0-6ubuntu1~16.04.11)
built with OpenSSL 1.1.1a 20 Nov 2018
TLS SNI support enabled
configure arguments: --user=www --group=www --prefix=/usr/local/nginx --with-http_stub_status_module --with-http_ssl_module --with-http_v2_module --with-http_gzip_static_module --with-http_sub_module --with-stream --with-stream_ssl_module --with-openssl=/home/vmmate/Src/lnmp1.5-full/src/openssl-1.1.1a --with-ld-opt='-ljemalloc'

3. 修改主机配置文件

ssl_protocols 加入 TLSv1.3 支持,如:

ssl_protocols TLSv1 TLSv1.1 TLSv1.2 TLSv1.3;

ssl_ciphers 参考配置(包含 TLS13 是 TLS 1.3 新增的 Cipher Suite,加在最前面即可;):

ssl_ciphers TLS13-AES-256-GCM-SHA384:TLS13-CHACHA20-POLY1305-SHA256:TLS13-AES-128-GCM-SHA256:TLS13-AES-128-CCM-8-SHA256:TLS13-AES-128-CCM-SHA256
:EECDH+CHACHA20:EECDH+CHACHA20-draft:EECDH+ECDSA+AES128:EECDH+aRSA+AES128
:RSA+AES128:EECDH+ECDSA+AES256:EECDH+aRSA+AES256:RSA+AES256:EECDH+ECDSA+3DES
:EECDH+aRSA+3DES:RSA+3DES:!MD;

文件修改完,重启一下 nginx:

sudo lnmp nginx restart

然后就可以去浏览器访问验证一下。

TLSv1.3 是否开启成功验证:

1、Chrome 70+ 版本打开网站,F12 打开开发者工具,「Security」可以看到 Connection - secure (strong TLS 1.3) 字样信息。
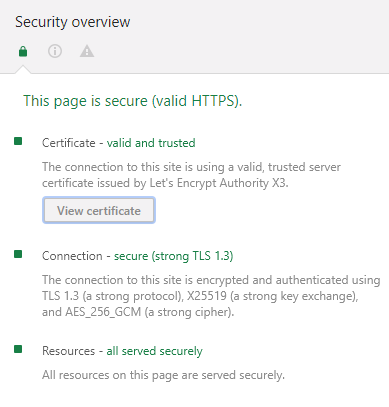
2、Firefox 63+ 版本打开网站,F12 打开开发者工具,「网络」,刷新页面,在「网络」资源列表下随便选中一个本站链接或者打开页面的链接,然后在右侧详细信息查看「安全性」即可看到连接协议版本。

3、在线检测:https://www.ssllabs.com。


Jan 06

Tomato 下面运行需要 SSL/TLS 连接的 Golang 程序(多为静态编译),可能会出现类似:

x509: certificate signed by unknown authority

这样的证书相关问题,目前遇到过的有 overture 以及 dnscrypt-proxy这里有讨论。

主要就是 x509 默认只在以下目录搜索证书:

"/etc/ssl/certs", // SLES10/SLES11, https://golang.org/issue/12139
"/system/etc/security/cacerts", // Android
"/usr/local/share/certs", // FreeBSD
"/etc/pki/tls/certs", // Fedora/RHEL
"/etc/openssl/certs", // NetBSD

或者这几个文件:(https://mirrors.segmentfault.com/golang/root_linux.go)


// Possible certificate files; stop after finding one.
var certFiles = []string{
"/etc/ssl/certs/ca-certificates.crt", // Debian/Ubuntu/Gentoo etc.
"/etc/pki/tls/certs/ca-bundle.crt", // Fedora/RHEL 6
"/etc/ssl/ca-bundle.pem", // OpenSUSE
"/etc/pki/tls/cacert.pem", // OpenELEC
"/etc/pki/ca-trust/extracted/pem/tls-ca-bundle.pem", // CentOS/RHEL 7
}

而 Entware 默认是安装在 /opt/etc/ssl 目录下;

查看 Golang 源码提示可以设置环境变量:

https://golang.org/src/crypto/x509/root_unix.go

const (
// certFileEnv is the environment variable which identifies where to locate
// the SSL certificate file. If set this overrides the system default.
certFileEnv = "SSL_CERT_FILE"
// certDirEnv is the environment variable which identifies which directory
// to check for SSL certificate files. If set this overrides the system default.
certDirEnv = "SSL_CERT_DIR"
)

解决办法:

1. 通过 Entware 安装 ca 证书:

opkg update
opkg upgrade
opkg install ca-bundle
opkg install ca-certificates

2. 在 /opt/etc/.profile 中设置环境变量:

# SSL for Golang
export SSL_CERT_FILE=/opt/etc/ssl/certs/ca-certificates.crt
export SSL_CERT_DIR=/opt/etc/ssl/certs

这样就没问题了。


Dec 03

项目地址:
https://github.com/aarond10/https_dns_proxy

特色功能:
自从 Google 发布 DNS-Over-HTTPS 服务以来,其实有很多基于此服务写的程序,但是目前看起来这个项目实现的比较好:
C++ 实现,执行文件很小 (30kiB,静态编译的版本约为 900k),比大多数用 Go 写的小得多
基于 Curl HTTP/2 API , 解析延迟极小
单线程无阻塞式查询,适用于嵌入式系统如路由器等
最好作为 DNSMASQ 这样带缓存的 DNS 服务器上游.
由于 Google 这个服务支持 EDNS SUBNET 的查询,所以理论上通过这个服务器查询的结果不会有 CDN 的问题,当然实际还需时间来证明。

Usage: https_dns_proxy [-a ] [-p ]
[-e ] [-d] [-u ] [-g ] [-b ]
[-l ]
-a listen_addr 监听地址. (127.0.0.1)
-p listen_port 监听端口. (5053)
-e subnet_addr edns-client-subnet edns 子网 “203.31.0.0/16”. 建议通过路由器外网地址来计算()
-d 后台运行.
-u user 用户名. (nobody)
-g group 用户组. (nobody)
-b dns_servers 用来解析 dns.google.com 的域名服务器. (8.8.8.8,8.8.4.4)
-t proxy_server 代理服务器,例如: socks5://127.0.0.1:1080,http://127.0.0.1:8080 (注意上面 dns.google.com 的解析不通过此代理!)
-l logfile 日志文件. (-)
-v 开启调试信息. (INFO)

上面的 subnet_addr 可以通过一些命令行获取,例如:

$(nvram get wan_ipaddr | cut -d "." -f 1-2).0.0/16

如果是内网,则应该用:

curl -sS ifconfig.co | cut -d "." -f 1-2
或者
wget http://ipecho.net/plain -O - -q | cut -d "." -f 1-2

这个在 Tomatoware 上静态编译稍微有点麻烦:

1. 首先要编译 curl (及其库)支持 http2,这样用到 nghttp2:

git clone https://github.com/tatsuhiro-t/nghttp2.git
cd nghttp2
autoreconf -i
automake
autoconf
./configure --prefix=/mmc
make
make install

2. 编译 curl :

#!/bin/sh

[ ! -e ./curl.pem ] && wget -qO curl.pem https://curl.haxx.se/ca/cacert.pem

[ -n "$1" ] && ssVersion=$1 || ssVersion="git"

mkdir -p done/${ssVersion}/OpenSSL-opt

echo "Compiling OpenSSL Version..."
make clean
[ ! -e  /opt/sbin/curl.pem ] && cp ./curl.pem /opt/sbin/
./configure --prefix=/mmc --with-ca-bundle=/opt/sbin/curl.pem --with-nghttp2 
--disable-ldap
make -j2 LDFLAGS="-all-static -s" LIBS="-ldl"
[ $? -eq 0 ] || { echo "Compiling OpenSSL failed."; exit 1; }
make install
mv -f src/curl done/${ssVersion}/OpenSSL-opt/

echo -e "Compile Result:n"

file done/${ssVersion}/OpenSSL-opt/curl

echo ""

done/${ssVersion}/OpenSSL-opt/curl -V

3. 静态编译 https_dns_proxy,修改过的 CMakeList.txt:

project(HttpsDnsProxy)
cmake_minimum_required(VERSION 2.8)

#set(CMAKE_BUILD_TYPE "Debug")
set(CMAKE_BUILD_TYPE "Release")

# set(CMAKE_C_FLAGS "-Wall --pedantic -Wno-strict-aliasing")

set(NXJSON_DIR lib/nxjson/)
set(NXJSON_SRC ${NXJSON_DIR}/nxjson.c)

find_path(LIBCARES_INCLUDE_DIR ares.h)
find_path(LIBCURL_INCLUDE_DIR curl/curl.h)
find_path(LIBEV_INCLUDE_DIR ev.h)
include_directories(
${LIBCARES_INCLUDE_DIR} ${LIBCURL_INCLUDE_DIR}
${LIBEV_INCLUDE_DIR} ${NXJSON_DIR} src)

# The main binary
set(TARGET_NAME "https_dns_proxy")
aux_source_directory(src SRC_LIST)
set(SRC_LIST ${SRC_LIST} ${NXJSON_SRC})
add_executable(${TARGET_NAME} ${SRC_LIST})
#set(LIBS ${LIBS} cares curl ev resolv ssl crypto dl z m)
set(LIBS ${LIBS} cares curl ev resolv ssh2 ssl psl crypto dl z m nghttp2)
target_link_libraries(${TARGET_NAME} ${LIBS})

# Link to static libraries if needed
IF(STATIC_LIB)
SET(CMAKE_FIND_LIBRARY_SUFFIXES ".a")
SET(CMAKE_EXE_LINKER_FLAGS "${CMAKE_EXE_LINKER_FLAGS} -s -static")
ENDIF(STATIC_LIB)

install(CODE "MESSAGE(\"Please install manually for now.\")")

然后:

mkdir b
cd b
cmake -DSTATIC_LIB=ON ..
make

file ./https_dns_proxy
./https_dns_proxy: ELF 32-bit LSB executable, ARM, EABI5 version 1 (SYSV), statically linked, stripped


Dec 16

1. 首先你需要购买一个域名;

2. 证书的获取:

Linux 下可以用 Certbot,acme.sh 等工具来从 Let’s Encrypt 获取证书;

Windows 下推荐用 Caddy 来获取证书,推荐把域名服务器临时设为 Cloudflare 的,然后通过 API 让 Caddy 自动获取证书,API 设置为环境变量,Caddyfile 简单设置为:

mydomain.com:443
root E:WWW
gzip
log ../access.log
tls {
dns cloudflare
}

然后直接运行一下 Caddy.exe 就行了,证书储存在 用户名/.caddy 目录下。

3. 创建服务端:

这里就要用到强大的 Gost 了,各类隧道创建方式:

gost -L="http://user:password@:25" -L="http2://user:password@:143?cert=cert.pem&key=key.pem" -L="socks+tls://user:password@:587?cert=cert.pem&key=key.pem" -L="http+tls://user:password@:465?cert=cert.pem&key=key.pem" -logtostderr -v 5

这么一行就依次创建了:一个监听在 25 端口的支持 http-connect 的代理,一个加密的 http2 代理,一个 Socks Over TLS 代理(目前 Surge 支持)和一个 https 代理,user:password 是用户名密码,cert 和 key 分别是上面域名的数字证书的公匙和私匙。

4. 客户端:

http,https 和 socks5 隧道,Chrome 浏览器(或者通过 SwitchyOmeda 扩展)都直接支持,Socks5 over TLS 目前只看到 Surge 直接支持,http2 没看到直接支持的。不过我们可以转换成普通的 http/socks5 代理来用(远程通讯依然是 TLS 或者 HTTP2 加密的),例如:

#转换 https 为 http,监听在本地 7575 端口
gost -L=http://0.0.0.0:7575 -F=http+tls://user:password@mydomain.com:465?cert=cert.pem&key=key.pem
#转换 socks5 over TLS 为 socks5
gost -L=socks://0.0.0.0:7676 -F=socks+tls://user:password@mydomain.com:587?cert=cert.pem&key=key.pem
#转换 http2 为 socks5
gost -L=socks://0.0.0.0:7878 -F=http2://user:password@mydomain.com:143?cert=cert.pem&key=key.pem

也可以用 HAProxy 做 socks+tls 和 https 的客户端,改天写下。

这样转换后的代理,是可以通过 redsocks2 来透明代理的。


Oct 12

源码: Psiphon 3 Tunnel Core 项目
编译:
原项目中关于编译说的比较简单笼统,这里详细说下。
首先确认 Go 编译环境已经安装好,可以参考 Tomatoware ARM 下建立 Go 编译环境 一文。
然后要下载一些依赖及源程序:
go get -u -v github.com/Psiphon-Inc/bolt
go get -u -v github.com/Psiphon-Inc/dns
go get -u -v github.com/Psiphon-Inc/goptlib
go get -u -v github.com/Psiphon-Inc/goregen
go get -u -v github.com/Psiphon-Inc/ratelimit
go get -u -v github.com/Psiphon-Inc/crypto/nacl/box
go get -u -v github.com/Psiphon-Inc/crypto/nacl/secretbox
go get -u -v github.com/Psiphon-Inc/crypto/ssh
go get -u -v github.com/Psiphon-Inc/goarista/monotime
go get -u -v github.com/Psiphon-Inc/goselect
go get -u -v github.com/Psiphon-Inc/sss
go get -u -v github.com/Psiphon-Inc/gocapability/capability
go get -u -v github.com/Psiphon-Inc/m3u8
go get -u -v github.com/Psiphon-Labs/psiphon-tunnel-core

写个编译脚本:

#!/bin/sh

WORKDIR=$(pwd)

cd src/github.com/Psiphon-Labs/psiphon-tunnel-core

BUILDDATE=$(date --iso-8601=seconds)
BUILDREPO=$(git config --get remote.origin.url)
BUILDREV=$(git rev-parse --short HEAD)
GOVERSION=$(go version | perl -ne '/go version (.*?) / && print $1')
DEPENDENCIES=$(echo -n "{" && go list -f '{{range $dep := .Deps}}
{{printf "%sn" $dep}}{{end}}' | xargs go list -f '{{if not .Standard}}
{{.ImportPath}}{{end}}' | xargs -I pkg bash -c 'cd $GOPATH/src/pkg
 && echo -n "\"pkg\":\"$(git rev-parse --short HEAD)\","' | sed 's/,$/}/')

LDFLAGS="
-X github.com/Psiphon-Labs/psiphon-tunnel-core/psiphon/common.buildDate=$BUILDDATE 
-X github.com/Psiphon-Labs/psiphon-tunnel-core/psiphon/common.buildRepo=$BUILDREPO 
-X github.com/Psiphon-Labs/psiphon-tunnel-core/psiphon/common.buildRev=$BUILDREV 
-X github.com/Psiphon-Labs/psiphon-tunnel-core/psiphon/common.goVersion=$GOVERSION 
-X github.com/Psiphon-Labs/psiphon-tunnel-core/psiphon/common.dependencies=$DEPENDENCIES 
"

cd ConsoleClient && go build -ldflags "${LDFLAGS}"
mv -f ./ConsoleClient ${WORKDIR}/bin/psiphon-tunnel-core-$BUILDREV
cd ${WORKDIR}
strip bin/psiphon-tunnel-core-$BUILDREV
upx -9 bin/psiphon-tunnel-core-$BUILDREV

bin/psiphon-tunnel-core-$BUILDREV

命令行运行:
./psiphon-tunnel-core -config ./psiphon.config -serverList ./server_list.dat -listenInterface br0 -formatNotices

psiphon.config 以及 server_list.dat 文件可以从 Windows 版本的 Psiphon3 (赛风3) 安装版本中提取。
运行结果:
psiphon-tunnel-core: Starting psiphon-tunnel-core...
2016-10-12T02:52:38Z BuildInfo {"buildDate":"2016-09-27T16:28:36+08:00","buildRepo":"https://github.com/Psiphon-Labs/psiphon-tunnel-core","buildRev":"31dad76","goVersion":"go1.6","gomobileVersion":"go1.6"}
2016-10-12T02:52:38Z AvailableEgressRegions {"regions":["CA","DE","GB","IN","JP","NL","SG","US"]}
2016-10-12T02:52:38Z ListeningSocksProxyPort {"port":7788}
2016-10-12T02:52:38Z ListeningHttpProxyPort {"port":8788}
2016-10-12T02:52:38Z ImpairedProtocolClassification {"classification":{}}
2016-10-12T02:52:38Z CandidateServers {"count":153,"protocol":"","region":""}
2016-10-12T02:52:42Z Homepage {"url":"http://www.psiphontoday.com/zh/index_desktop.html?client_region=CN"}
2016-10-12T02:52:42Z ClientUpgradeAvailable {"version":"116"}
2016-10-12T02:52:42Z Tunnels {"count":1}

出现 Tunnels {"count":1} 字样就表示连接服务器成功了。

新版编译出错:
# github.com/Psiphon-Labs/psiphon-tunnel-core/psiphon/common/tls
/mnt/data/compile/go/src/github.com/Psiphon-Labs/psiphon-tunnel-core/psiphon/common/tls/tls.go:106: undefined: deadlineTimeout

修改:

if !dialer.Deadline.IsZero() {
  		deadlineTimeout := dialer.Deadline.Sub(time.Now())
  		if timeout == 0 || deadlineTimeout < timeout {
  			timeout = deadlineTimeout
  		}
  	}

参考: https://github.com/golang/go/issues/14595


Mar 27

样本是 China Domain List,平台是 ASUS RT-AC68P ARM + Tomato,DNS 解析程序都是静态编译。支持排除/指定解析列表的,都加载了样本域名。没什么太大实际意义,蛋疼而已。

Unbound
Statistics:

Queries sent: 26919
Queries completed: 26832 (99.68%)
Queries lost: 87 (0.32%)

Response codes: NOERROR 20030 (74.65%), SERVFAIL 6714 (25.02%), NXDOMAIN 88 (0.33%)
Average packet size: request 28, response 50
Run time (s): 69.774275
Queries per second: 384.554336

Average Latency (s): 0.238396 (min 0.000236, max 4.992936)
Latency StdDev (s): 0.389999

Pdnsd:
Statistics:

Queries sent: 26919
Queries completed: 23513 (87.35%)
Queries lost: 3406 (12.65%)

Response codes: NOERROR 23234 (98.81%), SERVFAIL 171 (0.73%), NXDOMAIN 108 (0.46%)
Average packet size: request 28, response 59
Run time (s): 314.555457
Queries per second: 74.749935

Average Latency (s): 0.596292 (min 0.000358, max 4.999555)
Latency StdDev (s): 1.019165

dnsforwarder:
Statistics:

Queries sent: 26919
Queries completed: 25401 (94.36%)
Queries lost: 1518 (5.64%)

Response codes: NOERROR 25401 (100.00%)
Average packet size: request 28, response 61
Run time (s): 183.965017
Queries per second: 138.075165

Average Latency (s): 0.416087 (min 0.000227, max 4.999129)
Latency StdDev (s): 0.644664

ChinaDNS:
Statistics:

Queries sent: 26919
Queries completed: 21331 (79.24%)
Queries lost: 5588 (20.76%)

Response codes: NOERROR 21232 (99.54%), SERVFAIL 13 (0.06%), NXDOMAIN 86 (0.40%)
Average packet size: request 28, response 57
Run time (s): 363.248690
Queries per second: 58.722855

Average Latency (s): 0.375668 (min 0.015623, max 4.569101)
Latency StdDev (s): 0.340221

Pcap_DNSProxy
Statistics:

Queries sent: 26919
Queries completed: 25476 (94.64%)
Queries lost: 1443 (5.36%)

Response codes: NOERROR 25205 (98.94%), SERVFAIL 158 (0.62%), NXDOMAIN 113 (0.44%)
Average packet size: request 28, response 57
Run time (s): 513.577050
Queries per second: 49.605020

Average Latency (s): 1.716650 (min 0.059361, max 4.998602)
Latency StdDev (s): 1.207510


Mar 25

Windows 7 豪华中文版,在线安装英文语言包失败,用 Vistalizator 安装也失败。

查看出错代码 0x80070052。

原来是我把系统临时目录设到了内存盘,而这个内存盘为了性能我使用的是 FAT32 格式~ 安装语言包时它会解压 N 多个小文件/文件夹到临时目录,可能就是这出了问题。重新格式化内存盘为 NTFS 格式,安装成功!

FAT32 标称为65534,实际到2万+时已不稳定。
NTFS 似乎没有明确限制单目录文件数量,但有人反应在生成10万+ 文件的目录时遇到报错,想来应该是和文件属性(文件名等)、磁盘使用状况相关,至于对效率的影响,可以参考以下内容,以下内容为转载

似乎 FAT32 文件系统下的单一目录下的文件数限制在 20000 -30000 之间的一个数字。。。

具体就不知道是哪个了。。因为我在 解压一个有 30000 多个文件的 rar 文件到 fat32 目录的时候出现 磁盘满的提示。。但是磁盘并没有满。。。 每个目录都要描述它的内容所在的磁盘位置,名字等信息。这些信息是连续存放的,而且空间有限,用完了就不能再加了。改进的文件系统,目录信息自身也是在磁盘上不连续分布的,就没有这个问题了。不过一般来讲这个都不是问题。在文件很多的系统中,往往会自己创建子目录进行分类。比如VSS.
对于FAT16文件系统,可以保存的文件体积最大值是 4 GB - 1 byte (2^32 bytes - 1 byte);卷的最大体积是4GB;每个卷上最多可以保存的文件数量是65,536个 (2^16);根目录下可以保存的文件和文件夹数量最大值是512个(如果使用了长文件名,该数字还会减小)

对于FAT32文件系统, 可以保存的文件体积最大值是 4 GB - 1 byte (2^32 bytes - 1 byte);Windows自带的工具可以创建的卷的最大体积是32GB;每个卷中最多可以保存的文件数量是4,177,920个;一个特定文件夹中最多可以保存的子文件夹和文件的数量是65,534(如果使用了长文件名,那么该数字会减小)

对于NTFS文件系统,可以保存的文件的大小的最大值,理论上是16EB - 1 KB (2^64 bytes - 1 KB)(1EB=1024PB=1024TB=1024GB) ,实际实现过的最大值是16TB - 64 KB (2^44 bytes - 64 KB);卷的体积最大值,理论上可以达到2^64个簇 - 1个簇,实际实现过的最大值是2^56 TB - 64 KB ( 2^32 个簇 - 1个簇);每个卷可以包含的文件个数的最大值是4,294,967,295个 (2^32 - 1)

理论上FAT32单个目录下,最多可以包括65534个子目录或者文件。但是如果采用长文件名命名的话,实际可以容纳的文件数目会远远小于6万多。2万多属于正常现象。

NTFS克服了这个问题,但是对于单个目录下多文件的操作(拷贝,移动或者删除),比如说几万个小文件,每个十几k大,仍然十分头疼,个人觉得是死穴,也是正常现象。


Mar 23

一个是做 DNSSEC 的
auto-trust-anchor-file: "/opt/etc/unbound/root.key"
一个是
use-caps-for-id: yes
开启这两个参数任意一个,如果转发的 DNS (若干)上游服务器稍有“不遵循规范”的就会返回空值:

wrong 0x20-ID in reply qname
......
Capsforid fallback: getting different replies, failed
......

具体没做细研究了!

Use 0x20-encoded random bits in the query to foil spoof
attempts. This perturbs the lowercase and uppercase of query
names sent to authority servers and checks if the reply still
has the correct casing. Disabled by default. This feature is
an experimental implementation of draft dns-0x20.


Mar 18

1. 下载 JDK,用 7-zip 解压出 tools.zip;
2. 解压 tools.zip 文件到目标目录,例如: e:/JavaJDK;
3. 运行:
for /R %f in (.\*.pack) do @"D:\JavaJDK\bin\unpack200" -r -v -l "" "%f" "%~pf%~nf.jar"
4. 添加系统环境变量 JAVA_HOME 以及相关 bin 路径;
5. 添加注册表相关值;
x86:

Windows Registry Editor Version 5.00
[HKEY_LOCAL_MACHINE\SOFTWARE\JavaSoft]
[HKEY_LOCAL_MACHINE\SOFTWARE\JavaSoft\Java Runtime Environment]
[HKEY_LOCAL_MACHINE\SOFTWARE\JavaSoft\Java Runtime Environment\1.8]
"JavaHome"="E:\\JavaJDK"

x64:

Windows Registry Editor Version 5.00
[HKEY_LOCAL_MACHINE\SOFTWARE\WOW6432Node\JavaSoft]
[HKEY_LOCAL_MACHINE\SOFTWARE\WOW6432Node\JavaSoft\Java Runtime Environment]
[HKEY_LOCAL_MACHINE\SOFTWARE\WOW6432Node\JavaSoft\Java Runtime Environment\1.8]
"JavaHome"="E:\\JavaJDK"

这样系统内基于 Java 的程序都能正常运行了,开发也没问题。


Jan 05

想利用 DD-WRT 支持 Buffalo WZR-1750DHP 全部 512M 内存的固件来做编译机,安装了 Tomatoware。

编译一些无需通过 automake/autoconf 生成 Makefile 的源程序都没啥问题,但是一旦编译通过 autogen.sh (应该调用 automake 等程序)生成的 Makefile 就会直接出错,信息类似:

[goflex@GoFLEX:/home/local/goflex/work/shairport-sync_git 35%] ~ make
make all-recursive
make[1]: Entering directory '/home/local/goflex/work/shairport-sync_git'
Making all in man
Makefile:518: recipe for target 'all-recursive' failed
make[1]: *** [all-recursive] Error 1
make[1]: Leaving directory '/home/local/goflex/work/shairport-sync_git'
Makefile:371: recipe for target 'all' failed
make: *** [all] Error 2
[goflex@GoFLEX:/home/local/goflex/work/shairport-sync_git 36%] ~

参考:

https://forum.openwrt.org/viewtopic.php?id=60605

https://github.com/lancethepants/tomatoware/issues/18#issuecomment-168871785

目前没什么好的解决办法,好在出错的地方有些规律,就是在 Makefile 中 dot_seen=no; 这句上面的反斜杠“\”需要去掉;写了个脚本做提示:

#!/bin/sh

curr_dir=`pwd`

bad_makefile=""
bad_makefile_line=""

bad_makefile_line=$(sed -n '/dot_seen=no;/=' `grep -lr 'dot_seen=no;' $curr_dir`)
bad_makefile=$(grep -lr 'dot_seen=no;' $curr_dir)

for bfile in $bad_makefile; do
    echo $bfile
done

for line in $bad_makefile_line; do
    fi_line="$(($line - 1))"
    echo $fi_line
done

echo "sed -i 'LINEs/\//' FILE"

它会列出需要修改的文件,所在行数,提示用:

sed -i 'LINEs/\//' FILE

去修改。

参考上面的帖子链接,最终确认是 DD-WRT 自带 /bin/bash 的问题,解决方法是:在 ./configure 之前建立一个环境变量:

export CONFIG_SHELL=/mmc/bin/bash

用来覆盖配置文件建立时默认使用的 /bin/bash 即可。


[5/21]  < 1 2 3 4 5 6 7 8 9 10 > ... »