发布于Software分类中的文章

Dec 17

winXray:

https://github.com/winXray/winXray

ProxyPool:

https://github.com/zu1k/proxypool
https://github.com/yourp112/proxypool
https://github.com/sansui233/proxypool

Free Proxies:

https://proxypool.ga/

别问怎么用,懂得一看就知道了。winXray 是我用过最轻量最好用的各种 xx 协议 Windows 客户端;免费站自动抓取各种 xx 服务器,直接丢到 winXray 自动测速自动切换。

别问安全性那些问题,我不懂,可以不用的。 :roll:


Nov 14

极喜欢(默默)加驱,关键驱动又写不好。

之前用它的 Wise Folder Hider 结果内存泄漏找了好几天发现是 WiseFs64.sys 惹祸;这几天用了它的 Wise System Monitor ,刚又 WiseTDIFw.sys 蓝屏 !

说实话它家东西界面做的不错,看起来也是小巧,无奈这个底层写的真的是垃圾啊!

它家主页


Nov 13

Windows 下最好的透明代理软件,能让那些本身无法设置代理的软件通过 socks/https 连接出去,包括命令行程序。

V4 新的网络引擎基于 Windows 过滤平台 (WFP) 技术。这是在 Windows 平台上处理流量的最新方法。它提供了许多独特的功能,包括以下功能:

1. 能够处理所有连接,包括 Windows 商店应用程序(UWP,Universal Windows Platform),Windows 子系统的 Linux (WSL) ,和 Windows 共享文件夹
2. 在高负载情况下提高性能
3. 显著减少了与第三方软件(如防病毒软件)的冲突

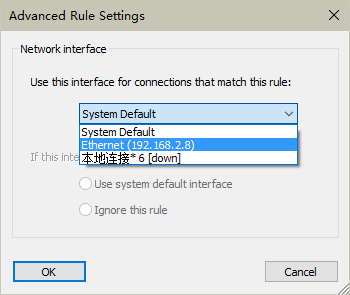
代理规则现在可以绑定到网络接口。当您需要选择通过特定接口(以太网、 Wi-Fi、 VPN 等)连接的目标和应用程序时,这允许 Proxifier 在全新的场景中工作。这实际上允许你:

1. 同时使用和管理多个 VPN 连接和代理服务器
2. 根据不同接口的可用性对流量进行优先级排序

新版也有专门的界面安装成服务了,无需登录也可以执行代理工作。

其它与 V3 大同小异的我就不累述了,懂的自然懂,不懂的官方有详细 PDF 说明书。

BTW:

1. 便携版不能代理命令行程序。
2. 新版需要卸载重装,请提前备份 profile 安装完后导入。


Nov 12

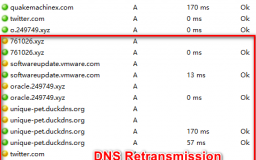
DNSQuerySniffer 查看系统 DNS 查询状况时发现每次查询都有重传 (DNS Retransmission) 现象(抓取方式选 WinPcap 时出现,选 Raw Sockets 不会)

折腾了好多天,卸载无数网络协议/驱动,最后发现卸载 VMware Bridge Protocol 现象消失,关掉开启的虚拟机也可以让现象消失。

这就不知道是 VMware 问题还是 WinPcap 问题了。。。 :?: :roll:

后续:

1. 上面已知 Bridge 模式会重传;
2. 试过 NAT 模式不会重传,但有无数 PTR 请求刷屏;
3. 用 Host-Only 模式,共享上网,目前一切OK。


Sep 26

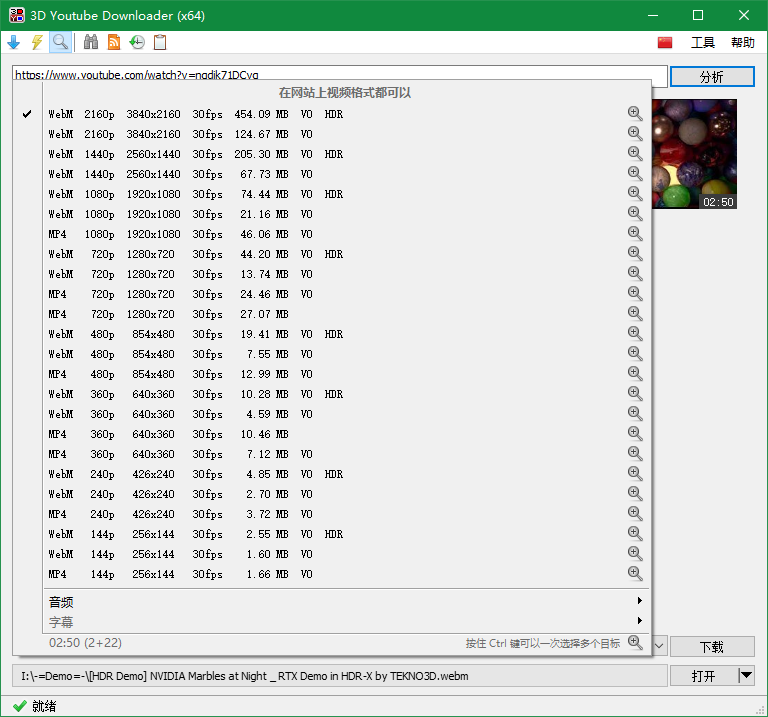
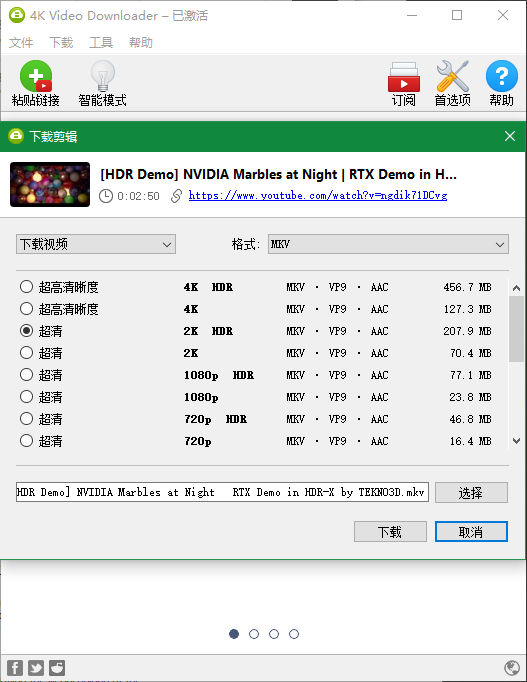
一般内容用 IDM 下没啥问题,但是目前的 IDM 6.38.1 可以识别并下载 HDR 视频流,但是混流有 BUG,体现在 madVR 显示 HDR 内容不完善,导致 HDR 播放失败: IDM 6.41 下载的 HDR 已经没有问题。

试了一堆软件,youtube-dl 当然是可以的,但是命令行太烦躁。最后选择了下面两个:

1. 3D Youtube Downloader

2. 4K Video Downloader

3D Youtube Downloader 下载后封装为 webm 格式,4K Video Downloader 则封装为 mkv 格式,都可以完美识别播放 HDR 内容。

下载:


补充: MediaHuman YouTube Downloader 选择下载 WEBM 格式的视频, 并且不转换的话,也可以下载到 HDR 文件, 只是不如上面两个来的直观.
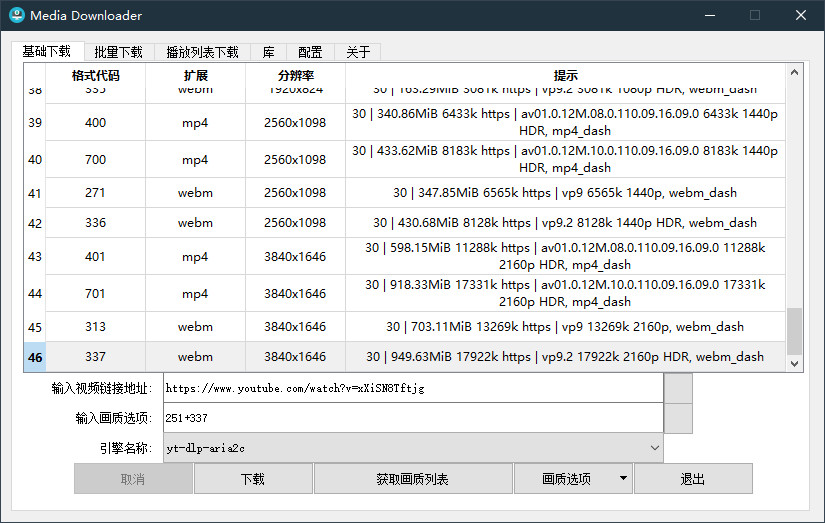
补充: MediaDownloader ,开源免费的,也很方便!

2023-08-28 增加: Gihosoft TubeGet


Mar 05

本脚本适用于 DD-WRT 和 Tomato,来源于: https://git.losert.xyz/krypton/Scripts/tree/master

适用于 LEDE/OpenWRT 的脚本在: https://gist.github.com/lg/e91d1c5c9640d963e13dbb1901bb4396

#!/bin/sh

##############################################
# This script disconnects connected clients, #
# where the signal is below the configured   #
# signal.                                    #
##############################################
# v1.0                                       #
# maintained by Rene Losert  #
##############################################
DEV=$(nvram show 2>&1 |grep ifname|grep 'wl[01]'|cut -d"=" -f2)
SIGNAL="-80"
EXCLUDE="38:D5:47:62:F8:7A"
key="$1"

if [[ "$key" == "-d" ]]; then
	echo "Signal Threshold: $SIGNAL"
	echo "Connected Clients:"
fi

while true; do

date=$(date +"%a %b %e %H:%M:%S %Z %Y")

for current in $DEV; do
CLIENTS=$(/usr/sbin/wl -a $current assoclist)
	for MAC in $CLIENTS; do    # for loop for each client (MAC)
		if [ $MAC != "assoclist" ]; then
			SIG=$(/usr/sbin/wl -a $current rssi $MAC)
			if [[ "$key" == "-d" ]]; then echo "MAC: $MAC, Signal: $SIG"; fi
			if [[ ! "$MAC" = "$EXCLUDE" ]]; then
				if [ $SIG -lt $SIGNAL ]; then
					if [[ "$key" == "-d" ]]; then echo "$date: BELOW! Sending deauth to $MAC"; fi
					echo "$date: BELOW! Sending deauth to $MAC" >> /tmp/cleanup.log
					/usr/sbin/wl -a $current deauthenticate $MAC
				fi
			fi

		fi
	done
done

if [[ "$key" == "-d" ]]; then echo "-----------------------------------"; fi
#echo $date >> /tmp/cleanup.log
sleep 5
done

:!: :!: :!:


Mar 03

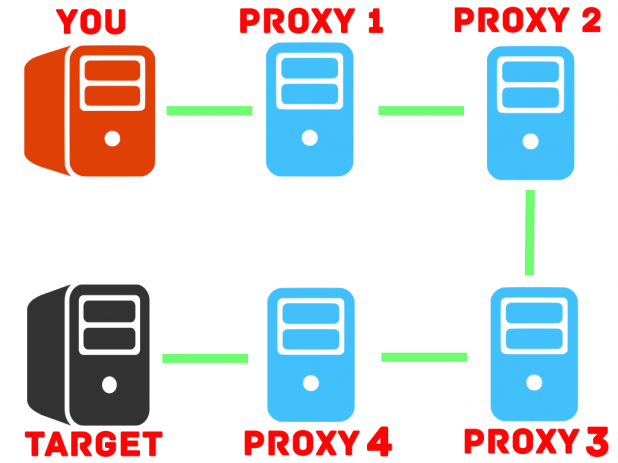
ProxyChain

这几个工具都支持带用户名密码认证的上级代理,代理可以是 socks4/5,http-connect 等,glider 和 gost 还额外支持 ss,ssr 作为上级代理,但是对用户名密码或者附加参数中带‘@’号处理有些问题。

还需要注意,代理链中的第二级代理(最后一级?),‘必须’要具有外网 IP ,不然很容易失败。(这也是为什么要求支持用户名密码认证)

范例:
本地代理监听 0.0.0.0:7777 端口,上级两个代理级联(代理链),第一代理为: 192.168.2.20:7575 ,第二代理为:1.1.1.1:10086 (用户名 user , 密码 passwd)

gost:(https://github.com/ginuerzh/gost)

gost -L=:7777 -F=socks5://192.168.2.20:7575 -F=socks5://user:passwd@1.1.1.1:10086 -D

glider: (https://github.com/nadoo/glider)

glider -listen 0.0.0.0:7777 -forward socks5://192.168.2.20:7575,socks5://user:passwd@1.1.1.1:10086 -verbose

proxychains+microsocks (https://github.com/rofl0r/proxychains-ng, https://github.com/rofl0r/microsocks)

proxychains 配置文件:
strict_chain
proxy_dns
remote_dns_subnet 224
tcp_read_time_out 15000
tcp_connect_time_out 8000
[ProxyList]
socks5 192.168.2.20 7575
socks5 1.1.1.1 10086 user passwd

命令行:
proxychains4 microsocks -p 7777

访问流程:
客户端请求-->SOCKS5:7777-->SOCKS5:192.168.2.20:7575-->SOCKS5:1.1.1.1:10086-->远程服务

gost 启动很慢,内存占用极高,glider 比较均衡,这两个都是 golang 编写的;proxychains+microsocks 是 C 写的,占用最小,适合配置不高的设备,但是需要自己编译,配置稍显麻烦。


Feb 11

Upcycle Windows 7 petition image

Microsoft's support of Windows 7 is over, but its life doesn't have to end. We call on Microsoft to upcycle it instead.


Aug 29

ECS (edns-client-subnet)的支持上,国内 DNS派,国外 Google 支持最好,而 Overture 支持上发 EDNS 信息,基于这几个特点,可以在 VPS (无论在国内还是国外)建立一个 CDN 友好的 DNS 服务器。

国外 VPS 配置范例:

{
"BindAddress": ":5353",
"DebugHTTPAddress": "127.0.0.1:5555",
"PrimaryDNS": [
{
"Name": "DNSPaiS",
"Address": "218.30.118.6:53",
"Protocol": "udp",
"SOCKS5Address": "",
"Timeout": 6,
"EDNSClientSubnet": {
"Policy": "auto",
"ExternalIP": "223.73.56.110",
"NoCookie": true
}
},
{
"Name": "DNSPaiM",
"Address": "101.226.4.6:53",
"Protocol": "udp",
"SOCKS5Address": "",
"Timeout": 6,
"EDNSClientSubnet": {
"Policy": "auto",
"ExternalIP": "223.73.56.110",
"NoCookie": true
}
}
],
"AlternativeDNS": [
{
"Name": "GoogleM",
"Address": "8.8.8.8:53",
"Protocol": "udp",
"SOCKS5Address": "",
"Timeout": 3,
"EDNSClientSubnet": {
"Policy": "auto",
"ExternalIP": "223.73.56.110",
"NoCookie": true
}
},
{
"Name": "GoogleS",
"Address": "8.8.4.4:53",
"Protocol": "udp",
"SOCKS5Address": "",
"Timeout": 3,
"EDNSClientSubnet": {
"Policy": "auto",
"ExternalIP": "223.73.56.110",
"NoCookie": true
}
}
],
"OnlyPrimaryDNS": false,
"IPv6UseAlternativeDNS": false,
"WhenPrimaryDNSAnswerNoneUse": "PrimaryDNS",
"IPNetworkFile": {
"Primary": "./cn.zone",
"Alternative": "./ip_network_alternative_sample"
},
"DomainFile": {
"Primary": "./domain_primary_sample",
"Alternative": "./domain_alternative_sample",
"Matcher": "regex-list"
},
"HostsFile": "./hosts_sample",
"MinimumTTL": 0,
"DomainTTLFile" : "./domain_ttl_sample",
"CacheSize" : 10000,
"RejectQType": [255]
}

国内/路由器等配置范例:(注意与国外的主要差别,使用了 Google 的 DNS-Over-TLS,否则会被污染)

{
"BindAddress": "0.0.0.0:5554",
"DebugHTTPAddress": "0.0.0.0:8081",
"PrimaryDNS": [
{
"Name": "DNSPaiS",
"Address": "123.125.81.6:53",
"Protocol": "udp",
"SOCKS5Address": "",
"Timeout": 3,
"EDNSClientSubnet": {
"Policy": "auto",
"ExternalIP": "223.73.56.110",
"NoCookie": true
}
},
{
"Name": "DNSPaiM",
"Address": "101.226.4.6:53",
"Protocol": "udp",
"SOCKS5Address": "",
"Timeout": 3,
"EDNSClientSubnet": {
"Policy": "auto",
"ExternalIP": "223.73.56.110",
"NoCookie": true
}
}
],
"AlternativeDNS": [
{
"Name": "GoogleM",
"Address": "dns.google:853@8.8.8.8",
"Protocol": "tcp-tls",
"SOCKS5Address": "",
"Timeout": 6,
"EDNSClientSubnet": {
"Policy": "auto",
"ExternalIP": "223.73.56.110",
"NoCookie": true
}
},
{
"Name": "GoogleS",
"Address": "dns.google:853@8.8.4.4",
"Protocol": "tcp-tls",
"SOCKS5Address": "",
"Timeout": 6,
"EDNSClientSubnet": {
"Policy": "auto",
"ExternalIP": "223.73.56.110",
"NoCookie": true
}
}
],
"OnlyPrimaryDNS": false,
"IPv6UseAlternativeDNS": false,
"WhenPrimaryDNSAnswerNoneUse": "AlternativeDNS",
"IPNetworkFile": {
"Primary": "/opt/etc/cn.zone",
"Alternative": "/opt/etc/empty"
},
"DomainFile": {
"Primary": "/opt/etc/empty",
"Alternative": "/opt/etc/empty"
},
"HostsFile": "",
"MinimumTTL": 300,
"DomainTTLFile" : "/opt/etc/domain_ttl.txt",
"CacheSize" : 8192,
"RejectQtype": [255]
}

:cool: :cool: :cool:


Aug 28

移动网络完全没法下载 BT,想到用电信网络做代理,试过 shadowsocks,3proxy 等大量 Socks5 服务器软件,都因为不支持 udp:// 格式的 Tracker 服务器导致速度上不去,最后用 Dante 解决问题。证据看下面用 Proxifier 代理 qBittorrent 的截图:

直接安装二进制文件:

apt install dante-server

这样安装下来的执行文件为: danted,配置文件为 /etc/danted.conf, 其它参考以下内容。

我们从源码安装 Dante:

# cd /usr/src
# wget http://www.inet.no/dante/files/dante-1.4.2.tar.gz
# tar -zxf dante-1.4.2.tar.gz
# cd dante-1.4.2/
# apt-get install gcc make
# ./configure --prefix=/usr/local --sysconfdir=/etc --localstatedir=/var --disable-client --without-libwrap --without-bsdauth --without-gssapi --without-krb5 --without-upnp --without-pam
# make && make install

之后检查下安装情况:

# /usr/local/sbin/sockd -v
Dante v1.4.2. Copyright (c) 1997 - 2014 Inferno Nettverk A/S, Norway

编辑配置文件:

# nano /etc/sockd.conf

内容如下:

logoutput: /var/log/sockd.log

internal: 0.0.0.0 port = 10086
external: ens3 #ipconfig 查看自己的接口,也可能是 eth0 等

socksmethod: username #本机用户名方式登录
user.privileged: root
user.notprivileged: nobody

client pass {
from: 0.0.0.0/0 to: 0.0.0.0/0
log: error connect disconnect
}

client block {
from: 0.0.0.0/0 to: 0.0.0.0/0
log: connect error
}

socks pass {
from: 0.0.0.0/0 to: 0.0.0.0/0
log: error connect disconnect
}

socks block {
from: 0.0.0.0/0 to: 0.0.0.0/0
log: connect error
}

启动服务器:

/usr/local/sbin/sockd -f /etc/sockd.conf -D

开机自启动:

systemctl edit dante --full --force

内容:

[Unit]
Description=Dante Socks5 Server Service
Documentation=man:dante(1)
After=network-online.target

[Service]
Type=simple
Restart=always
ExecStart=/usr/local/sbin/sockd -f /etc/sockd.conf

[Install]
WantedBy=multi-user.target

然后:

systemctl enable --now dante

添加无 SSH 登录权限用户(仅用于 Dante):

useradd -s /sbin/nologin yourname
passwd youname

然后在路由器上做端口映射,把 10086 端口暴露出去即可。 :mrgreen: :mrgreen: :mrgreen:


[2/21]  < 1 2 3 4 5 6 7 8 9 10 > ... »