发布于Software分类中的文章

Jul 07

运行在 U 盘的系统随着时间推移越来越大已经不能备份在 N1 的 EMMC 里,突然损坏的话就要做很多重复工作来复原。直接做盘对盘克隆有个限制就是目标盘必须比源盘容量大,同样是标称 8G 的 U 盘,非常有可能实际可用容量是不一样的,之前就是因为这样把一个 8G 的系统盘一直备份成了 64G 的 U 盘.。。。将要介绍的备份方法则没有这个限制,只要主分区(一般是 ROOTFS)的实际数据使用量不大于备份盘容量即可。

首先用 DiskGenius 将 U 盘的两个主要分区备份为: BOOT.pmf 和 ROOTFS.pmf 文件。注意这里 BOOT 分区备份最好选择 “备份所有扇区” 模式,因为这个分区并不大;而 ROOTFS 分区则选择 “按文件备份” 模式,这样我们就可以把整个系统恢复到较小的 U 盘上。(只要实际数据不大于恢复盘的总容量)

然后在 Linux 桌面模式(可以是虚拟机)把原系统的初始镜像 (比如: Armbian_20.10_Arm-64_focal_current_5.9.0.img) 恢复到新的 U 盘。因为初始镜像最小,我们其实只需要恢复这个系统默认的分区表和文件结构。这里推荐使用 balenaEtcher。恢复完成后用 GParted 或者 KDE Partition Manager 无损调整 ROOTFS 分区至你需要的大小,还可以在这个阶段创建 SWAP 分区。这一步理论上也可以在 Windows 下完成,比如恢复用 USB Image Tool,balenaEtcher Windows 版本等工具,然后用 DiskGenius 调整分区大小,但经过数次测试,这些对于 EXT 分区的操作在 Windows 下非常容易出错不能完成,或者完成后的 U 盘不能启动,或者是文件结构/分区表有问题。

最后在 DiskGenius 中把之前备份的 BOOT 和 ROOTFS 文件恢复到 U 盘对应的分区。

保险起见可以把这个盘最后一次加载到 Liunx 下用 fsck 检查一下各个分区。


Jun 29

armv5 架构下用 Tomatoware 静态编译 Zerotier 会出现 atomic 原子操作错误,解决的办法就是增加 -latomic 和删除 -pie:

#atomic error, add -latomic and delete -pie

# Static builds, which are currently done for a number of Linux targets
ifeq ($(ZT_STATIC),1)
	override LDFLAGS+=-static
	LDLIBS+=-latomic
endif

LDFLAGS=-pie -Wl,-z,relro,-z,now  ----> LDFLAGS=-Wl,-z,relro,-z,now

VFP 相关错误则需要修改 make-linux.mk 文件:

# ARM32 hell -- use conservative CFLAGS
ifeq ($(ZT_ARCHITECTURE),3)
	ifeq ($(shell if [ -e /usr/bin/dpkg ]; then dpkg --print-architecture; fi),armel)
		override CFLAGS+=-march=armv5t -mfloat-abi=soft -msoft-float -mno-unaligned-access -marm
		override CXXFLAGS+=-march=armv5t -mfloat-abi=soft -msoft-float -mno-unaligned-access -marm
		ZT_USE_ARM32_NEON_ASM_CRYPTO=0
	else
		override CFLAGS+=-march=armv5t -mfloat-abi=soft -msoft-float -mno-unaligned-access -marm
		override CXXFLAGS+=-march=armv5t -mfloat-abi=soft -msoft-float -mno-unaligned-access -marm
		ZT_USE_ARM32_NEON_ASM_CRYPTO=0
	endif
endif

Phicomm N1 下 aarch64 编译应使用:

CC=aarch64-linux-gcc CXX=aarch64-linux-g++ make -j`nproc` ZT_STATIC=1 ZT_SSO_SUPPORTED=0 ZT_CONTROLLER=0

因为如果编译 ZT_CONTROLLER 就需要 Rust,耗时太长,没什么必要。


Oct 06

这篇文章已被密码保护。请在这里输入密码:


Oct 06

详情见 MeTube 主页,我这里流水账一下:

#安装、升级 npm / n
apt install npm
npm -g install n
n lts

cd metube/ui

# 安装 Angular,构建 UI
npm install
node_modules/.bin/ng build

# 安装 Python 依赖
cd ..
pip3 install pipenv
pipenv install
python3 -m pip install aiohttp
pipenv install aiohttp

#安装 ffmpeg,合并音频视频,Youtube 新视频基本都需要合并
apt install ffmpeg

# 自定义环境文件测试运行
export DOWNLOAD_DIR=/home/wwwroot/metube
export URL_PREFIX=/metube
pipenv run python3 app/main.py

正常会输出:

INFO:ytdl:waiting for item to download
======== Running on http://0.0.0.0:8081 ========
(Press CTRL+C to quit)

可以浏览器连接: http://VPS-IP:8081,测试一下下载,没问题往下走。

配置 Nginx 转发:

#主转发代码
        location /metube/ {
            proxy_pass http://127.0.0.1:8081;
            proxy_redirect off;
            proxy_http_version 1.1;
            proxy_set_header Upgrade $http_upgrade;
            proxy_set_header Connection "upgrade";
            proxy_set_header Host $host;
        }
#没有问题这一块可以不要
        location ~* .(css|js)$ {
            proxy_pass http://127.0.0.1:8081;
            proxy_redirect off;
            proxy_http_version 1.1;
            proxy_set_header Upgrade $http_upgrade;
            proxy_set_header Connection "upgrade";
            proxy_set_header Host $host;
        }

添加到开机自动运行:

systemctl edit metube --full --force

粘贴如下代码,metube 源码路径,下载路径,反代目录,改成自己的:

[Unit]
Description=Metube Web Service
After=network.target

[Service]
Environment=DOWNLOAD_DIR=/home/wwwroot/metube
Environment=URL_PREFIX=/metube
Restart=always
Type=simple
WorkingDirectory=/root/src/metube
ExecStart=/usr/local/bin/pipenv run python3 /root/src/metube/app/main.py

[Install]
WantedBy=multi-user.target

然后执行:

systemctl enable --now metube

metube 就启动了,并且下次开机也会自己启动。

追加:
添加简单的密码认证:

#生成密码文件,添加用户名
sudo sh -c "echo -n 'sammy:' >> /etc/nginx/.htpasswd"
#为此用户设置密码
sudo sh -c "openssl passwd -apr1 >> /etc/nginx/.htpasswd"

然后添加到 metube 反代中:

location /metube/ {
    auth_basic           "Administrator’s Area";
    auth_basic_user_file /etc/nginx/.htpasswd";
    ...
}

Oct 03

SNI 分流后获取客户端 IP 一般通过 proxy_protocol 来实现,但分流后的某些程序不能识别 proxy_protocol 怎么办?比如我的 DoH 服务器要 IP 地址,但某木头马并不支持,我开启 proxy_protocol 这马就死了。

我们看代码片段,注意注释。

nginx.conf 主配置文件片段:

stream {
    # 这里就是 SNI 识别,将域名映射成一个配置名
    map $ssl_preread_server_name $backend_name {
        我的域名.坑 web;
        马.我的域名.坑 马;
        # 域名都不匹配情况下的默认值
        default web;
    }
    # 转发到 web 服务器
        upstream web {
        server 127.0.0.1:444;
    }
    # 转发到 马 前置服务器
        upstream 马 {
        server 127.0.0.1:446;
    }
    # 为 马 去除 proxy_protocol
    server {
        #nginx server 443 开启 proxy_protocol 后,分流后的所有服务也必须开启 proxy_protocol,否则会报错
        listen 127.0.0.1:446 proxy_protocol so_keepalive=on;
        proxy_protocol off; #然而,我们在这儿把 proxy_protocol 关闭掉,因为 马 不支持!这是关键
        proxy_connect_timeout 300s;
        proxy_timeout 300s;
        proxy_pass 127.0.0.1:445; #这就是 马 实际吃草的地方
    }

     # 监听 443 并开启 ssl_preread
     server {
         listen 443 reuseport;
         listen [::]:443 reuseport;
         proxy_pass $backend_name;
         ssl_preread on; #开启了分流
         proxy_protocol on; #开启了 proxy_protocol
    }
}

虚拟站点配置文件代码块,大致如下:

server
{
     #nginx server 443 开启 proxy_protocol 后,分流后的所有服务也必须开启 proxy_protocol,否则会报错
    listen 127.0.0.1:444 ssl http2 reuseport proxy_protocol;
    #下面三行给反代的 DoH 服务器传递了客户端 IP
    set_real_ip_from 127.0.0.1;
    real_ip_recursive on;
    real_ip_header proxy_protocol;

    server_name 三达不溜.我的域名.坑 我的域名.坑;
    index index.html index.htm index.php default.html default.htm default.php;
    root  /home/wwwroot/我的域名.坑;

    ssl_certificate /usr/local/nginx/conf/ssl/fullchain.cer;
    ssl_certificate_key /usr/local/nginx/conf/ssl/我的域名.坑_ssl.key;

    #反代 DoH 服务器
    location /dns-query {
        proxy_pass       http://127.0.0.1:8053/dns-query;
        proxy_set_header Host      $host;
        proxy_set_header X-Real-IP $remote_addr; #我要,真实的,IP!
    }

差不多这样。 :evil: :twisted: :cool:

来自 https://github.com/trojan-gfw/trojan/issues/433#issuecomment-692878138 的方法更加精妙:

stream {
    log_format basic '$remote_addr - $remote_user [$time_local] '
                     '$protocol $status $bytes_sent $bytes_received '
                     '$session_time';
    map $ssl_preread_server_name $backend {
        trojan6.domain.com unix:/run/nginx-trojan-stream.sock;
        trojan.domain.com unix:/run/nginx-trojan-stream.sock;
        default 127.0.0.1:443;
    }
    server {
        listen unix:/run/nginx-trojan-stream.sock proxy_protocol;
        proxy_pass 127.0.0.1:8443;
    }
    server {
        listen 0.0.0.0:443;
        listen [::]:443;
        proxy_pass $backend;
        ssl_preread on;
        proxy_protocol on;
    }
}

http {
    log_format combined '$proxy_protocol_addr - $remote_user [$time_local] '
                        '"$request" $status $body_bytes_sent '
                        '"$http_referer" "$http_user_agent"';
    server {
        listen 127.0.0.1:80 proxy_protocol;
        listen [::1]:443 ssl proxy_protocol;
        ...
    }
}

http 的 log_format 中,原来的将原来的 $remote_addr 替换成 $proxy_protocol_addr 就成了。

stream 中的第一个 server 就是为了接收带 proxy_protocol 的 stream,然后发出不带 proxy_protocol 的 stream 给 trojan。

另外,我用的是在 Ubuntu 20.04上 的 Nginx v.1.18.0,来自官方 apt 源的。


Feb 18

转自: https://www.chiphell.com/thread-1676546-1-1.html

零售3.5 SATA HDD汇总列表


Jan 15

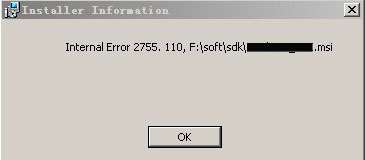
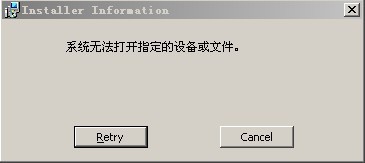
Windows\Installer 占用空间比较大,有些无聊人比如我就会把它移去另外目录并且拉个目录连接点(Junctions)过去。这样会导致一个大问题,就是有些基于 MSI 的安装文件不能正常执行,会提示“系统无法打开指定的设备或文件”接 “Internal error 2755. 110, ********.msi”。

网上关于权限方面的解决方案对于这种情况是无效的。

正确解决办法是,删除所有盘根目录下下的 Config.Msi 目录,如果 Windows\Installer 下有这个目录也一并删除,用 Everything 全盘搜一下即可,注意这个目录是 系统/隐藏 属性。

0_1287761554kNg6.gif
0_128776156113LS.gif

参考: https://bugs.documentfoundation.org/show_bug.cgi?id=134103

:razz:


Jan 13

1. 改 "app\vendor\symfony\finder\Iterator\SortableIterator.php":

        } elseif (self::SORT_BY_NAME_NATURAL === $sort) {
            $this->sort = static function (SplFileInfo $a, SplFileInfo $b) use ($order) {
                return $order * strnatcmp($a->getRealPath() ?: $a->getPathname(), $b->getRealPath() ?: $b->getPathname());

忽略大小写的自然排序:

        } elseif (self::SORT_BY_NAME_NATURAL === $sort) {
            $this->sort = static function (SplFileInfo $a, SplFileInfo $b) use ($order) {
                return $order * strnatcasecmp($a->getRealPath() ?: $a->getPathname(), $b->getRealPath() ?: $b->getPathname());

2. 改 "app\views\components\file.twig"

<div class="ml-2">
<button
title="{{ translate('file.info') }}"
class="flex justify-center items-center rounded-full p-2 -m-1 md:invisible hover:bg-gray-400 hover:shadow group-hover:visible"
v-on:click.prevent="showFileInfo('{{ url(file.getPathname) | escape('js') }}')"
>
<i class="fas fa-info-circle"></i>
</button>
</div>

不显示 Hash 按钮:

<div class="ml-2">
<button
title="{{ translate('file.info') }}"
class="flex justify-center items-center rounded-full p-2 -m-1 md:invisible hover:bg-gray-400 hover:invisible group-hover:invisible"
v-on:click.prevent="showFileInfo('{{ url(file.getPathname) | escape('js') }}')"
>
<i class="fas fa-info-circle"></i>
</button>
</div>

:roll:


Jan 04

简而言之如果你的 Windows 10 是 10.0.19042.685 版本(既 20H2)并且安装在固态硬盘上,在升级 KB4592438 后如果运行过 CHKDSK C: /F ,则有极大几率出现系统重启后蓝屏无法进入系统的现象!

解决办法就是进入恢复模式或者 PE,重新执行 CHKDSK C: /F,然后重启。

进阶脚本,特别适配了 Windows 10 新一代的 CHKDSK 参数:

ScanDisk.bat C: D: E: ... (指定扫描修复,最多接 9 个盘符)

:: BatchGotAdmin 
:-------------------------------------
@echo off
REM  --> Check for permissions
>nul 2>&1 "%SYSTEMROOT%system32cacls.exe" "%SYSTEMROOT%system32configsystem"

REM --> If error flag set, we do not have admin.
if '%errorlevel%' NEQ '0' (
    echo Requesting administrative privileges...
    goto UACPrompt
) else ( goto gotAdmin )

:UACPrompt
    echo Set UAC = CreateObject^("Shell.Application"^) > "%temp%getadmin.vbs"
    echo UAC.ShellExecute "%~s0", "", "", "runas", 1 >> "%temp%getadmin.vbs"

    "%temp%getadmin.vbs"
    exit /B

:gotAdmin
    if exist "%temp%getadmin.vbs" ( del "%temp%getadmin.vbs" )
    pushd "%CD%"
    CD /D "%~dp0"
    @echo on
:--------------------------------------

:: WindowsVersionChecker (detect OS) 
:--------------------------------------
@ECHO off
REM https://msdn.microsoft.com/en-us/library/windows/desktop/ms724832.aspx
REM 10.0 -- Win 10, Win Server 2016 TP2
REM 6.4 -- Win 10 TP, Win Server 2016 TP1
REM 6.3 -- Win 8.1, Win Server 2012 R2
REM 6.2 -- Win 8, Win Server 2012
REM 6.1 -- Win 7, Win Server 2008 R2
REM 6.0 -- Win Vista, Win Server 2008
REM 5.2 -- Win Server 2003, Win Server 2003 R2, Win XP 64-Bit Edition
REM 5.1 -- Win XP
REM 5.0 -- Win 2000

FOR /f "tokens=4,5,6 delims=[]. " %%a IN ('ver') DO (
    SET WVer=%%a.%%b.%%c
    SET WMajor=%%a
    SET WMinor=%%b
    SET WRev=%%c
)
:--------------------------------------

:: ScanDisk All::PrintInfo  (c) 2015 BSD-Clause 3
:--------------------------------------
@echo off
echo.
echo == ScanDisk All ==
echo   (C) 2014-2015 "" BSD-Clause 3
echo.
echo   This program will run CHKDSK on selected drives in an unattended manner.
echo   CHKDSK will be done in a two-steps way for safer execution.
echo   Supports:
echo     * NTFS
echo     * New generation CKHDSK commands (/scan /perf ...)
echo     * Special treatment of SYSTEM drive (C: as default).
echo       - Includes "sfc /scannow" for check system files integrity.
echo.
echo   Notice that if you system drive is not C:, you MUST change the line:
echo     SET SYSTEM_DRIVE=C:
echo.
echo   Press ANY KEY to continue...
echo.
pause>nul
:--------------------------------------

:: ScanDisk All 
:--------------------------------------
@echo off
REM The System Drive must be specially treated.
SET SYSTEM_DRIVE=C:

REM check Win8+ capabilities (requires WindowsVersionChecker)
if 62 LEQ %WMajor%%WMinor% (set CHKDSK_NG=1) else (set CHKDSK_NG=0)
if %CHKDSK_NG% == 1 (echo Info chkdsk: new capabilities enabled)

REM ^, -- ^ is the escape character for declarations  between '
for %%a in (%*) do (
    echo.
    echo ________________________________________
    if "%%a" == "%SYSTEM_DRIVE%" (
        if %CHKDSK_NG% == 1 (
            echo ### Read-Only ScanDisk of System Drive %%a
            chkdsk /scan /perf /forceofflinefix %%a
            echo ### Run System File Checker on System Drive %%a
            sfc /scannow
        ) else (
            echo Set ### System Drive %%a as dirty to force boot-scandisk scan
            fsutil dirty set %%a
        )
    ) else (
        echo ### Two-steps ScanDisk of unit %%a
        if %CHKDSK_NG% == 1 (
            REM http://www.minasi.com/newsletters/nws1305.htm (chkdsk Win 8+ features)
            chkdsk /scan /perf /forceofflinefix %%a
            chkdsk /X /offlinescanandfix %%a
        ) else (
            REM Old scan (backward compatibility              chkdsk /F /X %%a
            chkdsk /F /X /R /B %%a
        )
    )
)
:--------------------------------------

:: Power off routine 
rem :--------------------------------------
rem @echo off
rem echo Preparing to shutdown..."
rem shutdown /s /t 120
rem echo Press enter to abort shutdown
rem pause > nul
rem shutdown /a
rem echo Shutdown aborted
rem pause
rem :--------------------------------------

ScanDiskAll.bat (扫描修复机器上所有检测到的硬盘,可选扫描后重启)

:: BatchGotAdmin 
:-------------------------------------
@echo off
REM  --> Check for permissions
>nul 2>&1 "%SYSTEMROOT%system32cacls.exe" "%SYSTEMROOT%system32configsystem"

REM --> If error flag set, we do not have admin.
if '%errorlevel%' NEQ '0' (
    echo Requesting administrative privileges...
    goto UACPrompt
) else ( goto gotAdmin )

:UACPrompt
    echo Set UAC = CreateObject^("Shell.Application"^) > "%temp%getadmin.vbs"
    echo UAC.ShellExecute "%~s0", "", "", "runas", 1 >> "%temp%getadmin.vbs"

    "%temp%getadmin.vbs"
    exit /B

:gotAdmin
    if exist "%temp%getadmin.vbs" ( del "%temp%getadmin.vbs" )
    pushd "%CD%"
    CD /D "%~dp0"
    @echo on
:--------------------------------------

:: WindowsVersionChecker (detect OS) 
:--------------------------------------
@ECHO off
REM https://msdn.microsoft.com/en-us/library/windows/desktop/ms724832.aspx
REM 10.0 -- Win 10, Win Server 2016 TP2
REM 6.4 -- Win 10 TP, Win Server 2016 TP1
REM 6.3 -- Win 8.1, Win Server 2012 R2
REM 6.2 -- Win 8, Win Server 2012
REM 6.1 -- Win 7, Win Server 2008 R2
REM 6.0 -- Win Vista, Win Server 2008
REM 5.2 -- Win Server 2003, Win Server 2003 R2, Win XP 64-Bit Edition
REM 5.1 -- Win XP
REM 5.0 -- Win 2000

FOR /f "tokens=4,5,6 delims=[]. " %%a IN ('ver') DO (
	SET WVer=%%a.%%b.%%c
	SET WMajor=%%a
	SET WMinor=%%b
	SET WRev=%%c
)
:--------------------------------------

:: ScanDisk All::PrintInfo  (c) 2015 BSD-Clause 3
:--------------------------------------
@echo off
echo.
echo == ScanDisk All ==
echo   (C) 2014-2015 "" BSD-Clause 3
echo.
echo   This program will run CHKDSK on all drives in an unattended manner.
echo   CHKDSK will be done in a two-steps way for safer execution.
echo   The computer will be shutdown after finishing, but can be aborted
echo   by pressing enter.
echo   Supports:
echo     * NTFS
echo     * FAT32
echo     * New generation CKHDSK commands (/scan /perf ...)
echo     * Special treatment of SYSTEM drive (C: as default).
echo       - Includes "sfc /scannow" for check system files integrity.
echo.
echo   Notice that if you system drive is not C:, you MUST change the line:
echo     SET SYSTEM_DRIVE=C:
echo.
echo   Press ANY KEY to continue...
echo.
pause>nul
:--------------------------------------

:: ScanDisk All 
:--------------------------------------
@echo off
REM The System Drive must be specially treated.
SET SYSTEM_DRIVE=C:

REM check Win8+ capabilities (requires WindowsVersionChecker)
if 62 LEQ %WMajor%%WMinor% (set CHKDSK_NG=1) else (set CHKDSK_NG=0)
if %CHKDSK_NG% == 1 (echo Info chkdsk: new capabilities enabled)

REM ^, -- ^ is the escape character for declarations  between '
for /f "skip=1 tokens=1,2 delims= " %%a in ('wmic logicaldisk get caption^,filesystem') do (
	echo.
	echo ________________________________________
	if "%%a" == "%SYSTEM_DRIVE%" (
		if %CHKDSK_NG% == 1 (
			echo ### Read-Only ScanDisk of System Drive %%a
			chkdsk /scan /perf /forceofflinefix %%a
			echo ### Run System File Checker on System Drive %%a
			sfc /scannow
		) else (
			echo Set ### System Drive %%a as dirty to force boot-scandisk scan
			fsutil dirty set %%a
		)
	) else if "%%b" == "NTFS" (
		echo ### Two-steps ScanDisk of %%b unit %%a
		if %CHKDSK_NG% == 1 (
			REM http://www.minasi.com/newsletters/nws1305.htm (chkdsk Win 8+ features)
			chkdsk /scan /perf /forceofflinefix %%a
			chkdsk /X /offlinescanandfix %%a
		) else (
			REM Old scan (backward compatibility  			chkdsk /F /X %%a
			chkdsk /F /X /R /B %%a
		)
	) else if "%%b" == "FAT32" (
		echo ### Two-steps ScanDisk of %%b unit %%a
		chkdsk /F /X %%a
		chkdsk /F /X /R %%a
	)
)
:--------------------------------------

:: Power off routine 
rem :--------------------------------------
rem @echo off
rem echo Preparing to shutdown..."
rem shutdown /s /t 120
rem echo Press enter to abort shutdown
rem pause > nul
rem shutdown /a
rem echo Shutdown aborted
rem pause
rem :--------------------------------------

参考:

https://borncity.com/win/2020/12/18/windows-10-20h2-chkdsk-damages-file-system-on-ssds-with-update-kb4592438-installed/


Dec 17

winXray:

https://github.com/winXray/winXray

ProxyPool:

https://github.com/zu1k/proxypool
https://github.com/yourp112/proxypool
https://github.com/sansui233/proxypool

Free Proxies:

https://proxypool.ga/

别问怎么用,懂得一看就知道了。winXray 是我用过最轻量最好用的各种 xx 协议 Windows 客户端;免费站自动抓取各种 xx 服务器,直接丢到 winXray 自动测速自动切换。

别问安全性那些问题,我不懂,可以不用的。 :roll:


[1/21]  1 2 3 4 5 6 7 8 9 10 > ... »